
The Smarter Way to Use Your Ollos Patches: A Placement Guide That Actually Works

You've invested in natural pain relief. You've committed to supporting your body's healing process rather than just masking symptoms. Now here's the question that determines whether your Ollos patches deliver the results you're hoping for:
Where exactly are you placing them?
If you're like most people, you probably stick to them wherever it hurts and hope for the best. But here's what we've learned from hundreds of users and clinical observations: precision placement can make the difference between "okay relief" and "wow, this actually works."
Your body's pain signals, nerve pathways, and circulation patterns are remarkably sophisticated. When you understand how to work with these systems rather than just slapping a patch on top of them, everything changes.
Why Placement Matters More Than You Think
Think of your Ollos patch like a key. The right key in the wrong lock won't open the door, no matter how good the key is.
Your patch works by delivering far infrared therapy deep into tissues, enhancing blood flow by up to 19.7% in treated areas. But that therapeutic energy needs to reach the right tissues to make a real difference.
Here's what happens when you nail the placement:
The infrared waves reach deeper into the specific tissues that need healing
Blood flow increases exactly where it's needed most
Your body's natural pain-relief mechanisms get activated in the right areas
You experience relief that feels both immediate and lasting
Miss the mark by even an inch or two? You might still get some benefit, but you're leaving a lot of potential relief on the table.
The Big Three: Your Most Important Placement Areas
Let's start with the areas where most people need the most help. These are the spots where modern life hits hardest, and where precise placement can make the biggest difference.
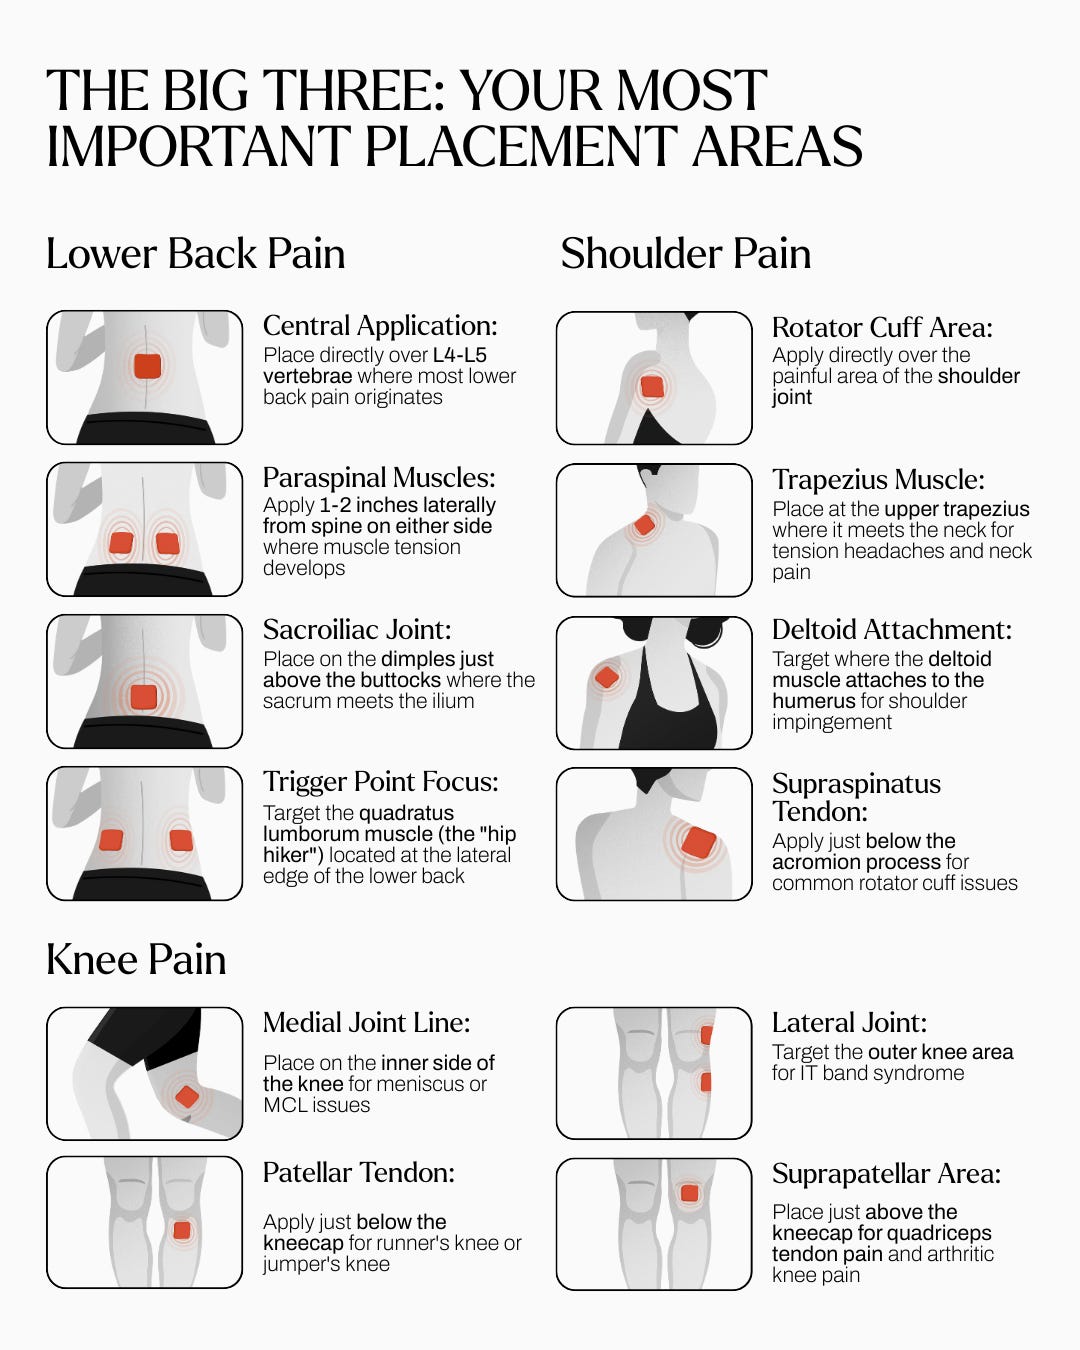
Lower Back: The Foundation of Everything
Your lower back isn't just one big muscle that hurts. It's a complex network of specific structures, each with its own job and its own way of calling for help.
For Central Lower Back Pain: Place your patch directly over the L4-L5 vertebrae area. This is where most lower back pain originates, and it's roughly at the level of your belt line, right in the center of your back. Why this works: This placement targets the exact area where your spine experiences the most stress from sitting, lifting, and daily movement.
For Side-Radiating Pain: Apply patches 1-2 inches laterally from your spine on either side. These target your paraspinal muscles – the ones that work overtime when your core isn't supporting your spine properly.
For Deep Hip Pain: Target those dimples just above your buttocks. This is your sacroiliac joint, and it's often the hidden culprit behind lower back pain that seems to come from nowhere.
Shoulders: Your Most Complex Joint
Your shoulder can move in more directions than any other joint in your body. That flexibility comes with a price: lots of ways for things to go wrong.
For General Shoulder Pain: Apply directly over the painful area of the shoulder joint. Sometimes the simplest approach is the right approach.
For Tension Headaches That Start in Your Shoulders: Place your patch at the upper trapezius where it meets your neck. This is that spot that feels like a rock when you're stressed, and it's often the real source of those tension headaches you've been fighting.
For Rotator Cuff Issues: Target just below the acromion process – that bony protrusion at the top of your shoulder. This placement reaches the supraspinatus tendon, the most commonly injured part of your rotator cuff.
Knees: Your Body's Shock Absorbers
Your knees take a beating every day. Each step creates forces up to three times your body weight, and different parts of your knee respond to different types of stress.
For Inner Knee Pain: Place on the medial joint line (inner side) for meniscus or MCL issues. This is particularly effective for pain that worsens when you twist or pivot.
For Kneecap Pain: Apply just below the kneecap for runner's knee or jumper's knee. This targets the patellar tendon, which connects your kneecap to your shin bone.
For Arthritis or General Knee Stiffness: Position just above the kneecap in the suprapatellar area. This placement helps with overall knee mobility and those deep, achy sensations that come with wear and tear.
Advanced Strategies: Working with Your Body's Systems
Once you've mastered the basics, these advanced techniques can take your results to the next level.
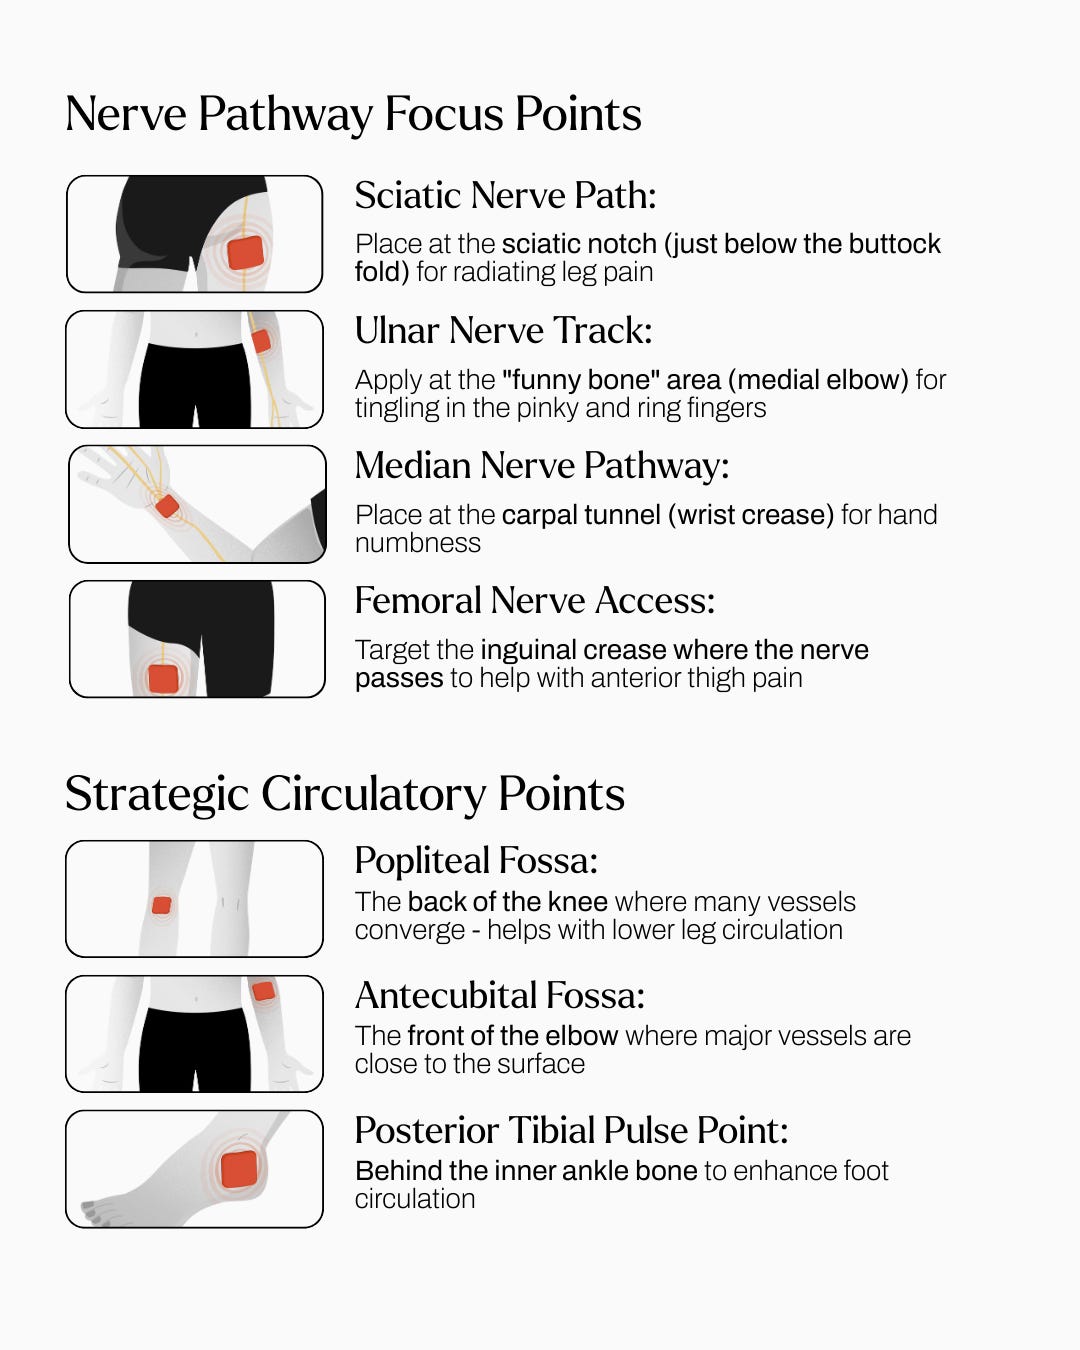
The Nerve Pathway Approach
Sometimes the best place to address pain isn't where you feel it, but where it originates.
For Radiating Leg Pain: Instead of (or in addition to) placing a patch where your leg hurts, try positioning one at the sciatic notch – just below your buttock fold. This targets the sciatic nerve pathway at its source.
For Hand Numbness: Place a patch at your wrist crease (the carpal tunnel area) rather than on your numb fingers. You're addressing the median nerve pathway where it's actually being compressed.
For Tingling in Your Pinky and Ring Fingers: Target the "funny bone" area at your elbow. This addresses the ulnar nerve track where it's most vulnerable.
The Circulation-Enhanced Method
For issues with your extremities, try the dual-placement approach:
Place one patch at the problem area (your sore wrist, achy ankle, stiff fingers) Place a second patch at the main circulatory access point (the front of your elbow, behind your knee, at your temple)
This creates a circulation pathway that enhances blood flow throughout the entire region.
Time-Based Strategies That Work
Morning Applications: Target areas that feel stiff when you wake up. These are usually joints that have been immobile all night and need gentle activation. Apply your patch 30-45 minutes before you need to be active. Let the far infrared therapy prepare your tissues for the day ahead.
Evening Applications: Focus on areas that accumulate tension throughout the day. For most people, this means neck and shoulders – the spots where stress likes to set up camp.
Pre-Activity Placement: Planning a workout or physical activity? Apply patches 30-45 minutes beforehand to increase blood flow to areas you'll be using. It's like a warm-up for your tissues.
The Eastern Medicine Connection
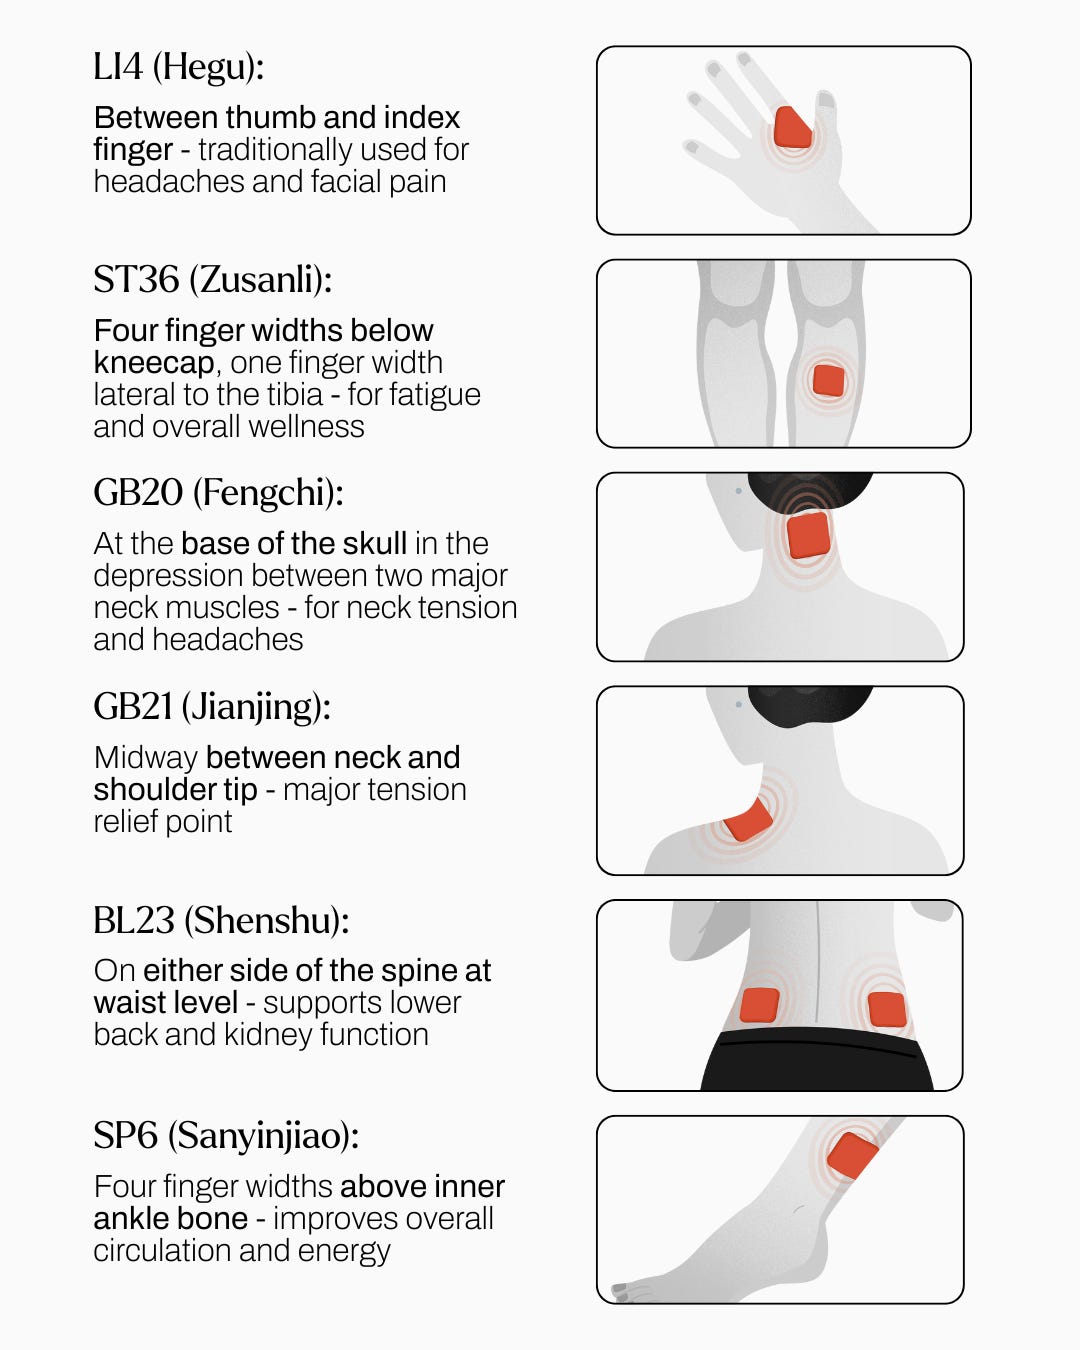
Traditional Chinese Medicine has mapped the body's energy pathways for thousands of years. While our patches work through far infrared therapy rather than energy meridians, many of these traditional points correspond to areas where modern science shows concentrated nerve and blood vessel activity.
LI4 (Between Thumb and Index Finger): Traditionally used for headaches and facial pain. Modern anatomy shows this area has rich nerve and blood vessel networks that connect to head and neck regions.
ST36 (Four Finger Widths Below Kneecap): Known in traditional medicine for supporting overall energy and wellness. This point sits over important blood vessels and nerve pathways that serve the entire lower leg.
GB20 (Base of Skull, Neck Depression): A traditional tension and headache point that corresponds to where major neck muscles attach and where blood vessels enter the head.
These points aren't magic – they're anatomically strategic locations where your patch can influence multiple systems at once.
Common Mistakes That Sabotage Your Results
Mistake #1: The "Slap and Hope" Approach. Putting your patch wherever it's convenient rather than where it's effective.
Fix: Take 30 seconds to identify the specific structure that's causing your pain, then target it precisely.
Mistake #2: Ignoring Your Body's Feedback. Not paying attention to how different placements feel and work for you.
Fix: Keep mental notes about which placements give you the best results. Your body will teach you if you listen.
Mistake #3: Expecting Instant Magic. Removing the patch too quickly because you don't feel immediate relief.
Fix: Allow 30-45 minutes for full activation. The far infrared therapy needs time to increase circulation and activate your body's natural healing responses.
Mistake #4: Never Varying Your Placement. Using the exact same spot every time, which can lead to skin sensitivity over time.
Fix: Rotate your placement slightly with each application. You're still targeting the same general area, just giving your skin a break.
Making It Work in Real Life
For the Desk Worker:
Morning: Target your neck/shoulder junction before your first video call
Midday: Focus on your lower back during lunch
Evening: Address wherever tension has built up during the day
For the Active Person:
Pre-workout: Apply to areas you'll be using 30-45 minutes before activity
Post-workout: Target areas that worked hardest during recovery time
Rest days: Focus on chronic problem areas that need ongoing support
For the Chronic Pain Warrior:
Develop a rotation system hitting different aspects of your pain pattern
Use the dual-placement approach for complex pain
Track which placements give you the best relief over time
Your Personal Placement Experiment
Here's the truth: while these guidelines give you a strong foundation, your body is unique. The most effective placement for you might be slightly different from what works for someone else.
Try this 7-day experiment:
Day 1-2: Use the basic placement for your primary concern Day 3-4: Try the nerve pathway approach Day 5-6: Experiment with circulation-enhanced placement Day 7: Use whichever approach worked best
Pay attention not just to immediate relief, but to how you feel hours later and the next morning. The goal isn't just temporary comfort – it's supporting your body's natural healing process.
The Bottom Line
Your Ollos patches aren't just delivering temporary relief – they're providing your body with the tools it needs to heal itself more effectively. But like any tool, they work best when used skillfully.
Precision placement isn't about perfection. It's about understanding your body well enough to give it the support it needs, where it needs it, when it needs it.
Start with the basic placements for your primary areas of concern. Pay attention to how your body responds. Experiment with the advanced techniques when you're ready.
Most importantly, remember that the best placement is the one that helps you feel better and move more freely through your life.
Your body has been trying to heal itself all along. Now you know how to help it succeed.
Ready to experience the difference that precision placement can make? Your next patch application is an opportunity to discover just how effective natural healing can be when you work with your body's wisdom rather than against it.